Thursday, March 1, 2012

See you there!!

Guess what?!

I've been working on creating a new blog. I've been wanting to combine my fresh designs blog and my fresh fotos blog into one wonderful new blog for quite some time now. And today is the official move day!


I have one post up for the time being and over the course of the next few weeks plan to fill it with sample photography, designs, and whatever else I feel like (including giveaways and freebies). In the past I have had the goal to blog every day with a public blog and I have gotten overwhelmed really fast! So I am shooting for once or twice a week with the new blog.

I've also added some stuff to my etsy shop and have sold a few things! Woohoo.

Feel free to help me spread the word. I'm hoping to get a facebook page up soon too. I'm not going toooo crazy with all of this, but I do want my information to be out there and to have fun with it.

You can find my new button in the upper left hand corner of this blog:)

Hope to see you there often!!

Wednesday, November 23, 2011

a little of what I've been up to.

I am so sorry for this poor neglected blog. I was hoping to roll out a new look and concept for this blog this summer, but it seems time is not on my side these days.

If only I didn't have so many things I wanted to do all the time.

I've been enjoying taking on more photography for friends and family. See here for more of that.

I've been busy with house projects... taking down a big rock wall, putting new stuff up, rearranging, redecorating, and revamping just about everything else (my office, guest bedroom, boys room, and living room).

Oh yeah, and I've been cooking and cleaning, running (hooray!), playing with my boys, and having fun with friends and church responsibilities.

Also, my husband and I have been working towards filling a little booth at a local craft boutique. He is selling his hand-crafted (wood-turned) oil viles and pens. I am selling custom prints. Here are some pictures:


If I can get time to be on my side for a little bit I am hoping to fill my etsy shop up with custom prints (to print at home, which means they will be cheap- yay!), and roll out a new website that combines my photography and design. If I keep on working towards it it will eventually all come together right?! Here's to progress!!!

Monday, July 4, 2011

happy fourth

Hope you are all having a festive fourth:) We are having a pretty low-key holiday around here since we just got back from a fun weekend trip to Park City. These are some things I want to incorporate into next years festivities:

Does anybody do it up quite like the folks from hostess?

I love the simple and fun napkin rings!

Love the above pinwheels.

And I must try these adorable and delectable-looking cheesecake shots!

And no fourth for me is quite complete without sparklers! Wanna learn how to make cool photos with sparklers, or just take better photos of fireworks? I linked to something similar last year, but it's always good to have a refresher... click here for a great firework photo tutorial or here.

Wanna learn another fun photo trick? I followed this tutorial to create the below images from this last weekend! Try it!! It's easier than you think:)
Photobucket
Photobucket

Tuesday, June 28, 2011

a few things...

Things are a brewing over here. My husband will most likely be quitting his second job and I am going to attempt to start my own photography and design business!! Over the next few months I plan to work on getting my photography and design portfolio posted to a new blog, combine this blog with my photography blog in a big redesign and hopefully will be posting regularly... really regularly, unless my business takes off soooo fast that I can't keep up with a blog. Ha! That probably won't happen. So... bare with me and I'll keep you posted. Thanks so much to all of you who check this blog occasionally and even better, SUBSCRIBE (bless you :) )!!

Here's a fun tip in the meantime. Are you a budding photographer? Or are you just getting into photography to take better pictures of loved ones? I have to tell you about the great deals I found this week so you can be on the lookout for similar deals in your area!! Tis' the season for garage-saling ;) I picked this up at a garage sale this last week for $45 (retail $150)!!

Then during a DI run I found this for $5!!! It's an old screen projector:)

I thought back to a product I had seen while browsing around like it here that was used for baby backgdrops, which retailed for $200!!

I love my $5 version!! It is COMPLETELY adjustable and collapses down so that it is oh-so-easy to transport.

I am still on the lookout now for a bigger background/backdrop stand for cheap somehow. I made one about two years ago out of PVC pipe, but I wasn't very happy with how it worked. It wasn't very strong and was a bit of a headache. Until then though I am excited about the above finds and have lots to learn about studio lighting:)

Friday, May 20, 2011

m.i.a.

Did you all think I had dropped off the face of the planet? Truth be told, my husband got a second job and I have had very little free time as of late. The free time I do have is generally spent playing with my boys, spring cleaning, cooking, catching up on my google reader, tending to church related stuff, reading up on how to be a better mom, and the likes. I have found time to fit in some projects, but haven't found the motivation to blog about them as of yet.

Here are a few things though...

I took some senior pics the other week for a cute girl and posted them on my photo blog here:
Photobucket

I designed some announcements for a friend of mine who is adopting:
Photobucket

I made this quiet activity for my boys to play with at church:
Photobucket
It works great! I got the artwork here, printed it all out on magnetic printer paper, cut it out and stuck it all in one of these tins I got from Michael's using a 40% off coupon. I am thinking of making some more magnet sets- the possibilities are endless! Did you know that most kid movies and shows have awesome websites with free printable characters?! Check out this cool magnet set too!!! So much fun:)

I also thought of a cool way to use all those round little containers that come in the tins I bought:
Photobucket
(sorry for the not-so-hot photo above, but I didn't want to wait to post any longer)
I came up with this idea after my little boy came home from preschool with the letters of his name written on the tops of milk carton lids... I decided to make the whole alphabet and have plans to make numbers also. I simply printed out a well spaced alphabet on printable sticker paper, cut each letter out with a circle punch I had (3/4"), and stuck them onto the cute little containers. Uppercase on top of the clear lid, and lower case inside. We have had a lot of fun making up words with them! With numbers I plan to put numbers on top and the corresponding number of dots on the inside. What a fun learning tool for getting him ready for kindergarten, right?!

Anyway, those are just a few of the things that I have been up to. Hopefully more fun posts of fun summer ideas, and activities are on the way. We are hoping to get to some remodeling done in our home this summer too, so I will also try to share any tips I learn with you all:) TTFN!!

Wednesday, February 23, 2011

my button.

Just a note to anyone who subscribes to, checks in on occasionally, or even links to this blog through theirs. First of all- THANK YOU!! Second of all- sorry that so many of you have been taken to a random shoe website lately. Because I was low on money and lazy I didn't renew my domain name and web-hosting account for the website I created awhile back. I still have my fresh designs blog (obviously I suppose:), but my website is no longer and someone else bought my domain name (darn it!!!). So if you have been directed to a shoe website by clicking on my fresh designs button, I apologize (and am so glad it isn't anything worse!).

I have updated my buttons now and if you happen to display a button of mine (again, THANK YOU!!!!!!), if you could update the html to read 'freshdesignsstudio.blogspot.com' rather than 'freshdesignsstudio.com' I would REALLY appreciate it. Or just do this- go to edit my button, erase what's there, and copy this:

<a href="http://www.freshdesignsstudio.blogspot.com">
<img src="http://i191.photobucket.com/albums/z57/Kaelars/button.png"/></a>

Then click save and it should be fixed! So sorry for the hassle!!! I've learned my lesson on being lazy with domain names!! Hope this makes sense! Please let me know if you are still confused and/or need help updating buttons and I will get back to you asap. Thanks again!!!!

Thursday, February 17, 2011

organizing 2011

Remember this post on organizing jewelry? I'm guessing no, but I want to update it a little. We've moved from an apartment to our first home in the last year and I've found a better way to store my earrings and jewelry and thought I would share.

I store my earrings in this now and LOVE it:
Photobucket

The rest of my jewelry now goes in a standing mirror jewelry armoire. You can see a teeny bit of it in the picture below.

Another storage solution I came up with and love (I think I came up with it... maybe my sister gave me the idea... but I don't think I have seen it anywhere) is this one for some of my hair stuff:

Photobucket

The upper two pictures are mainly what I wanted to show you- just two old oatmeal containers store all my headbands (I have a lot I know). What a great way to store headbands etc. though, right?! You could make them a lot more visually appealing by modge-podging some pretty paper on them I'm sure, but I just never seem to get around to it. I'm not that motivated because nobody ever sees them really but me.

The lower two pictures I thought I would show you because that is where I store all my getting ready stuff and I get ready there each morning. We only have one bathroom in this little home of ours for now, so it comes in pretty handy. It's just a sofa table (hand-me-down) we painted, then put shoe storage shelves (garage sale find) underneath it for storage. I used fabric from curtains I got at a garage sale (10 for $10!!) and tailor-made them to cover up my stuff down there. I made side panels for the bottom too, but put them on after I took this picture.

Oh, and the mirror above it? I got it for $1 at a yard sale and painted it to match too:) I love me some good deals!!

Hope these have inspired you in some small way...

I hesitate to post house pics, because my house is never how I want it really, but I've decided recently to be proud of what I have done and be okay that it is all a works in progress. So expect to see more house pics and let me know what you think.

Monday, February 7, 2011

isn't he cute?!


This was my first attempt at a glove-stuffed animal. I made a couple of mistakes but all in all I thought he turned out pretty cute!

I got the gloves on clearance for $2 and everything else I had around the house. I sewed his eyes with embroidery thread and I made his mane out of scrap felt. I realized in posting these pics that he still needs a tail. I think I will braid him a tail out of yarn and sew it on.

I also think he needs a little heart sewn on to his chest. Then I can give him to my 18 month old and see if he likes him enough to make more to add to my little glove-aminal family!

Tuesday, January 18, 2011

i know.

I am not as attentive to this blog as I should be. But life... well you know. It just keeps on rolling and sometimes this blog suffers because of it. I am sorry for that. But I will try to make it up to you.

That being said, I have an announcement to make. I suppose it isn't that big of a deal, but I have decided to make 2011 my year of sewing! And I plan to share what I do on here. I've got house projects to sew and I've got toys to make (I've decided next year 70% of my boys toys will be homemade- 100% of their toys from ME and I figure Santa can do what he wants for the other 30%).

Here are some of the toys that I hope to create this year:

Lots of sock and glove stuffed animals kinda like these from here.

-play dough like this.

-felt story board stories like this.

-a boy doll like using this pattern.
-felt food like this.

-feed the monster toss game kind of like this.

-felt fishing set like this.

-house or farm pack and go set like this.
-dress up clothes, pajamas, robe, hooded towel, quilt... the list goes ON... we'll see what I can get to:)

As far as other projects go, I have pillows to sew, cushions to recover, clothes to alter. Stay tuned! (And please be patient- I will try to put other fun seasonal and holiday info, projects, recipes, and anything else I find interesting on here to share also:) )

Friday, December 17, 2010

stocking stuffers, etc.

I love stockings! I am usually the first one up every Christmas. Even to this day I wake up before my kids and can't wait for them to wake up. When I was younger I would always wake up another one of my sisters and we would proceed to sneak out into the living room, take out everything in our stocking, then try to put it all back ever so carefully so there was no sign of mischief. My mom was a good stocking stuffer too. She put such special and fun things in them and I have always looked forward to opening my stocking as much as I did any present. So, I have tried to follow in her tradition of putting similar things in my kids stockings. Hopefully they will like the ones I make for them as much as I always liked mine.


These, to me, are some things that a good stocking might entail:

I love me a good new toothbrush. Mints. Gum. CANDY (must include one candy cane for traditions sake). An orange- it's tradition! For me the holy grail of oranges is a nice satsuma orange. Books (personalized ones are especially fun for Christmas so you can tell your kids Santa made it especially for them). Dvds. Jewelry. Socks. Hair Stuff. Fun art supplies. Magazines. And Gift Cards.

You could tailor the stuff on the above list for any gender and for any age. The important thing with stocking stuffers is to have fun and keep the person you are buying for in mind. I generally like to leave buying stocking stuffers for last as kind of a last minute shopping detail to look forward to, but some things are fun to buy in advance, especially if you need to special order it.

Here are a couple more ideas:


And I absolutely loved the stocking stuffer ideas from Restoration Hardware this year!!

What do you like in your stockings?

Also, does your family pile up in the car to see Christmas lights every year like mine does? How about sprucing that tradition up a little? A friend emailed me this week with this adorable idea from this blog. I am going to have to do something like that this year to jazz up our annual "Christmas Lights Drive." Will be purchasing these for next year!

Thursday, December 16, 2010

teacher gift

I realize I promised I would share stocking stuffer ideas next, but I just finished a teacher gift craft so I thought I would share. I made it with stuff I had around the house and it was pretty fast and easy.

Here is the finished product:
Photobucket

To make it I used these that I bought at a craft store a couple of years ago.
I bought them because they were so cheap and I could think of a ton of ways to use them.

Then I whipped up some quick and cute teacher designs for them to make them into a jewelry set using this digital scrapbooking kit (I made the card using the kit too).
Then I had my husband drill some tiny holes into the top of them.

Next I glued the little designs I had printed and cut out on using diamond glaze and put a glaze finish on them. You could probably also just modge podge them.

After that it was just a matter of putting some jump rings in them and putting them on a necklace and earring set I had in my stash of beading stuff. Easy fast and cute!! My kind of project:)

I also included this for fun:
Hope my little guy's teacher likes them, and I hope you find these ideas useful:)

Friday, December 10, 2010

holiday cheer

Two more weeks until Christmas! I planned on doing lots more gift guides, but am feeling a little uninspired in that department. I do have a few other things for you though- here are some things to (hopefully) inspire you for these last couple of weeks leading up to the big day!!

CJane's Chup shared some great ideas on gift ideas for your man today!

Here are lots of gift ideas I posted last year: Catch all gift guide 2009.

West Elm has the best free downloads for gift tags, dinner parties and the likes here.

Want another idea for a fun neighbor/friend gift? Copy some of your favorite recipes onto these cute and free recipe cards from Shabby princess.

Click here and here for my favorite holiday treat recipes. No holidays are complete without them for me!!

Hope these ideas help!

*Next up: Favorite stocking stuffer ideas.

Friday, December 3, 2010

what a girl wants

So this is more of a "what I want" list than a gift guide. What can I say, a girls gotta dream, and I may be a little on the selfish side.

1. Frye boots 2. Lucky bag 3. Trapper hat 4. Final Cut Express 5. Cowl neck scarf 6. Bamboo Craft Pen Tablet 7. Geek Glasses
*More holiday and gift ideas on the way.


Sunday, November 21, 2010

cool toys I want... um, for my kids

Shopping for toys is so much fun. Sometimes I think I am worse than my kids when it comes to having a case of the 'gimmes.' I fall in love with so many toys I want them to have. I am done Christmas shopping for my little guys, but because I love shopping (and more importantly love toy shopping) I couldn't help myself from looking a little more. SO, I thought I would share some of the great things I found that I wish I had looked into before my Christmas budget had been spent:)

pummmpkin

I may be obsessed. It seems these days I cannot get enough of pumpkin baked goods. The funny thing is that I am not a big fan of the ever-so-popular (especially this time of year) pumpkin pie. I don't really dislike pumpkin pie, I just would prefer a lot of other pies over pumpkin.

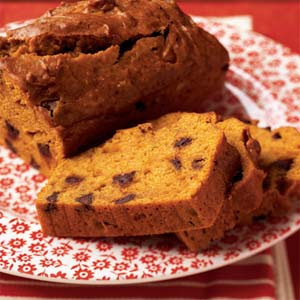
So when I came across pumpkin chocolate chip bread a few years ago I was a little surprised with just how much I loved it. I craved it. Last year my love for pumpkin became official when I had a pumpkin chocolate chip bar with cream cheese frosting. I knew I had to find me some good pumpkin recipes to try to replicate these delectable treats in my own home.

As my thanksgiving treat to you, I am sharing my favorite pumpkin recipes. I hesitated to at first because I didn't want to look like a copycat of one of my hero's Dana, as she has had a great line-up of pumpkin recipes to share recently. But she hasn't shared two of my favorite yet, so without further ado... enjoy!!


Pumpkin Chocolate Chip Bread

2 C. sugar
2 C. canned pumpkin (A regular sized can of pumpkin is just under 2C. and works just fine)
1/2 C. canola oil
1/2 C. vanilla pudding
4 eggs
3 C. all purpose flour
2 tsp. cinnamon
1 1/4 tsp. salt
1 tsp baking soda
1 C. semisweet chocolate chips

Preheat oven to 350°.

Combine first 5 ingredients in a large bowl, stirring well with a whisk. Lightly spoon flour into dry measuring cups; level with a knife. Combine flour, cinnamon, salt, and baking soda in a medium bowl, stirring well with a whisk. Add flour mixture to pumpkin mixture, stirring just until moist. Stir in chocolate chips.

Spoon batter into 2 (8 x 4-inch) loaf pans coated with cooking spray. Bake at 350° for 1 hour and 15 minutes or until a wooden pick inserted in the center comes out clean. Cool 10 minutes in pans on a wire rack, and remove from pans. Cool completely on wire rack.

*Recipe adapted from here.


Pumpkin Chocolate Chip Bars


4 eggs
1 cup vegetable oil
2 cups sugar
1 can (15 ounces) pumpkin
2 cups flour
2 teaspoons baking soda
1 teaspoon baking powder
1/2 teaspoon salt
2 teaspoons cinnamon*
1/2 teaspoon ginger*
1/2 teaspoon ground cloves*
1/2 teaspoon ground nutmeg*
1 1/2 - 2 C. semisweet chocolate chips

Preheat oven to 350 degrees F. Combine first four ingredients in a large bowl. Using a wire whisk, mix together flour, baking powder, baking soda, salt, and spices; add to pumpkin mixture and mix well. Fold chocolate chips in. Pour into greased and floured jelly roll pan. Bake for 20 to 25 minutes. Cool.

* May substitute all these ingredients with 1 tablespoon and 1/2 teaspoon pumpkin pie spice.


Cream Cheese Frosting

8 ounces cream cheese, softened
1 cup butter, softened
1 teaspoon vanilla
5 cups powdered sugar

Beat together the cream cheese, butter, and vanilla extract, gradually add powdered sugar. Frost cooled cake. Cut into bars.

*Recipe adapted from here.
*Image borrowed from here.

Wednesday, October 20, 2010

halloween dinner

We had a halloween dinner last Saturday. The plan was to carve pumpkins after dinner, but the kids were having so much playing on their own and all the adults were too tired to assist in much pumpkin carving, so we made it a two night event- Saturday and Monday.

Saturday we had chili, smoked pork roast, roasted hot dogs, pasta salad, green salad, apples dipped in caramel, doughnuts, sugar cookies and homemade root beer. Mmm, mmm. Monday we had left overs. It was great fall fun! Here are some pictures:

The invite:


Homemade root beer made from dry ice is so perfect for Halloween:)
Photobucket
The decor (gotta love the Dollar Store):
Photobucket
Photobucket
Photobucket
Photobucket
Photobucket
Photobucket
Photobucket
After all of the festivities I had to toast all of those pumpkin seeds of course. I tried the following yummy recipe and have been enjoying snacking on these a little too much!

1. Heat oven to 300 degrees.
2. Place washed seeds on cookie sheets and cook for up to an hour until all seeds are dry.
3. Coat in the following mixture:

For every 2 cups of seeds melt 2 Tbsp butter, 2 Tbsp sugar, 1/2 tsp kosher salt, 1/4 teaspoon cinnamon.

4. Bake for another 10 or so minutes.

Click here to see more of the picturesque scenery and weather I was able to enjoy in the last week. I think fall is becoming my favorite season for sure.

Tuesday, September 21, 2010

halloween: my plans

I think my love of Halloween stems from my love of candy. I also love to dream up costume ideas, decor ideas, and party ideas.

This is what I am planning for this year:

Costumes-

My eldest will be Pinnochio. He has recently developed a fascination with the character and his story and I am taking full advantage as I love Pinnochio! My baby boy will be Cleo the fish (I know Cleo is a girl, but oh well). And I will be figaro the cat (because being a cat is officially the easiest adult costume out there and I was lucky it fit our 'theme'). I told my husband he could be Geppetto or the Blue Fairy and he opted for neither as he does every year.


I am pretty stoked about how the costumes are turning out. This is what I have so far.

Cleo, the fish:
Photobucket

I am so proud of this little costume. It certainly is not perfect, but I love it anyway. I came up with it after researching all the little fish costumes I could find online. My favorite was this one from Martha, but I didn't trust myself to be able to sew those scales so perfectly and I knew my baby was now too mobile to put up with the bunting type costume anymore so I dreamt this little number up:) The best part is it cost me about $5!!!

Pinnochio:
Photobucket

This costume was fairly simple as well. I was lucky to get a yellow polo on clearance, then headed off to my local Joannes to pick up the felt for the hat, the feather, the buttons, and cheap fabric for the shorts and bow. This probably cost me between $10-15. I used a pajama bottom pattern I had for the shorts and just put the elastic in the back. I love making costumes (when they turn out). They are usually cheaper, look better and of better quality than costumes from the store!!

For my Figaro costume I am just going to wear all black and put on some ears, a tail, and a little nose and whiskers via a little face paint.

I will be getting my Halloween decorations out this weekend. I meant to last weekend, but such is life. I am hoping to make this craft with my four year old to add to our decorations this year.

And next week we are planning to have a small party here too. Basically just a yummy dinner and pumpkin carving with a few other families and some decorations. I will share those details on here soon:)